Hey guys, if you’re running a custom stamping shop or rely on stamped parts for your manufacturing line, you know how big a headache a broken stamping die can be. I’ve been selling custom stamping dies for over 12 years now, and let me tell you—90% of the downtime my customers complain about isn’t because the die was garbage when we delivered it. It’s because they skipped basic maintenance. No cap, I’ve seen dies that should’ve lasted 10 years die in 18 months just ‘cause no one bothered to wipe off the rust or tighten a single screw after a run. Today I’m gonna break down the main maintenance stuff I tell every new client of mine, ‘cause keeping your die in good shape doesn’t just save you cash—it keeps your production on track too. Custom Stamping Die
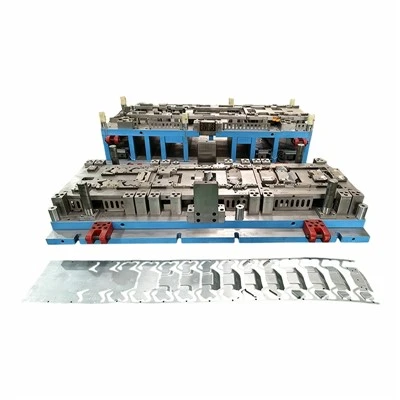
First off, let’s start with the daily stuff, ‘cause this is non-negotiable. When you finish a run, no matter how tired you are, you gotta pull the die out of the press and give it a deep clean. I see so many guys just leave it sitting there with all the metal shavings, lubricant gunk, and leftover part fragments caked on, right? That’s a one-way ticket to die failure. Here’s the thing: those shavings are sharp, they’ll scratch the surface of your die’s core and cavities faster than you can blink. And if you leave lubricant (even the good stuff) on metal overnight, it’ll attract moisture and rust—especially if your shop’s not climate-controlled, which let’s be real, most small to mid-sized shops aren’t.
What exactly do you need to do for daily clean-up? Grab a stiff-bristle brush (don’t use a wire brush, that’ll scratch too) and wipe down every single surface: the punch, die, stripper plate, guide pins, the whole shebang. For the gunk that’s stuck on, use a mild degreaser and a soft rag—no abrasive cleaners, trust me, those will ruin the precision finishes on the die that make your parts fit right. And don’t forget the inside of the die! The little gaps between components where shavings love to hide. I always tell my clients to use compressed air (low pressure, like 30-40 PSI, not max) to blow out those tiny spots, ‘cause if a shaving gets stuck in a guide pin hole, that’s gonna cause binding next run. Also, after cleaning, dry every part completely—even the tiniest spot of moisture is enough to start rust. Throw a light coat of rust-preventive oil on all metal surfaces after cleaning too, just a thin layer, not so much that it’s dripping.
Next, weekly maintenance. This is the stuff that takes an hour every week, but it saves you 10 hours of downtime when the die breaks mid-big order. First up, inspect the guide system. Guide pins and bushings are what keep your punch and die aligned, right? If those are worn, your parts will come out wonky, or the punch will hit the wrong spot and chip. So grab a flashlight and check every guide pin—look for scuffs, scratches, or groves along the length. Spin the pin gently by hand, if it feels rough or gets stuck, that’s a sign it’s wearing out. And check the bushings too—they’re the female part, so if the inner surface is damaged or the pin wiggles more than like.002 inches, you need to replace them. I tell clients not to wait till they cause a problem—replacing guide pins/bushings is way cheaper than repairing a punch that got misaligned and broke.
Also on weekly to-do: check all the fasteners. Bolts, screws, clamps that hold the die components together, everything. Vibration from the press runs all day long will loosen those suckers, especially the ones on the stripper plate and punch holder. Loose bolts mean the punch isn’t sitting straight, so you’ll get uneven cuts or the punch will shift and hit the die edge. Use a torque wrench to tighten everything to the spec I give you when you receive the die—don’t guess, ‘cause over-tightening can crack the die too. Another thing: inspect the stripper plate. That’s the part that pushes the stamped part off the punch after each run. If the stripper is worn, or the springs inside it are weak, the part will stay on the punch, causing jams. Press all the springs in the stripper—if they don’t bounce back right, or if some are looser than others, replace ‘em. Again, don’t wait for a jam to fix this, that’ll stop your whole line.
Now, monthly maintenance, which is more in-depth and usually gets done when the die’s not in use for a few days. First, measure the die’s critical dimensions. This is super important for custom stamping dies, ‘cause every die is made for a specific part, so the measurements are exact. Use a micrometer, calipers, or coordinate measuring machine (CMM) if you have one—measure the punch length, die cavity size, the distance between guide pins, all the specs we listed when we built the die. If any of these are off by more than like.005 inches, that’s a sign of wear, and you need to address it before it gets worse. For example, if the die cavity is wearing on one side, that’ll make your parts too big, or cause the punch to side load, which breaks punches.
Also monthly: check for surface wear and damage. Look at the cutting edges of the punch and die—those are the parts that do the actual stamping, right? If they’re chipped, rounded, or have built-up edge (that’s when metal from the stamped part sticks to the cutting edge), that’ll make rough cuts and cause defects. If the built-up edge is small, you can use a honing stone to smooth it out, but if the edge is chipped or worn, you might need to grind it or even send it back to be reworked (which is way easier than replacing the whole die). Oh, and check for any cracks in the die—especially in high-stress areas, like the corners of the die cavity. Cracks spread fast, and if you ignore them, the die will break mid-run and you’ll lose a whole batch of parts.
Then there’s the long-term maintenance, the stuff you do every 6 months or when you’re switching the die to a different part or storing it for a while. First, if you’re storing the die for more than a week, don’t just leave it in the press. Take it apart (carefully, label every component so you don’t mix them up later), clean every part thoroughly, coat with rust preventive (maybe a thicker coat for long storage), wrap it in plastic to keep moisture out, and store it in a dry, temperature-controlled area. If you leave it assembled in the press, the guide pins will stay in one position and wear unevenly, and parts can get stuck and rust over time.
Another long-term thing: perform a test run after a big order or after any repairs. If you did any grinding on the cutting edges, or replaced a guide pin, don’t just jump into a 10,000-part run. Do a small test run of like 50-100 parts, check each one for dimensional accuracy, burrs, and alignment. That way you can catch any small issues before they mess up a huge batch. I always tell my clients this, ‘cause I’ve had a customer skip the test run once and run a whole batch of parts that were all off by.01 inches—they lost $20k worth of material and downtime, all ‘cause they wanted to skip 10 minutes of testing.
Wait, let me also throw in some common mistakes I see all the time that make maintenance go wrong. First, using the wrong lubricant. A lot of guys just use whatever oil’s lying around, but stamping dies need specific lubricants—something that’s good for metal forming, prevents rust, and doesn’t leave gummy residue. Using a cheap oil will lead to more build-up on the die, which causes scratches. Second, not keeping maintenance records. Write down when you cleaned the die, when you tightened bolts, when you replaced springs. That way you can track when parts are wearing out, and replace them before they fail. I give every customer a little log sheet with their die, and it’s the best tool they have for staying on top of maintenance. Third, waiting till something breaks to fix it. That’s the biggest one. Most small issues (a loose screw, a slightly worn guide pin) are super cheap to fix, but if you ignore them, they turn into broken punches, cracked dies, weeks of downtime.

At the end of the day, custom stamping dies are an investment, right? You didn’t buy that die for a couple hundred bucks, you paid good money for it to make consistent parts for years. Maintenance isn’t an extra cost—it’s protecting that investment. If you skip even the basic stuff, you’re basically throwing money down the drain. If you’re not sure how to do any of this, or you need a custom stamping die for your new parts, hit us up to chat through your needs. We don’t just sell dies—we’ll also walk you through all the maintenance stuff specific to your die, ‘cause every custom die’s a little different, and we want your stuff to run smooth for as long as possible.
Home Appliance Stamping Parts References:
- ASM International. (2005). Die Maintenance and Repair. ASM Handbook, Volume 14: Metalworking: Sheet Forming.
- Tooling U-SME. (2018). Stamping Die Maintenance Fundamentals. Society of Manufacturing Engineers.
- Bosch Rexroth. (2020). Guide System Maintenance for Metal Stamping Dies. Industrial Hydraulics and Pneumatics Technical Documentation.
- Kalpakjian, S., & Schmid, S. R. (2021). Manufacturing Processes for Engineering Materials (7th ed.). Pearson Education.
Dongguan Changdong Tool & Die Co., Ltd.
With abundant experience, we are one of the most reliable custom stamping die manufacturers and suppliers in China. Please feel free to buy advanced custom stamping die made in China here from our factory. Good service and quality products are available.
Address: No. 56-B, Fumin South Road, Dalang Town, Dongguan City, Guangdong Province, China
E-mail: sales@stamping-die.com
WebSite: https://www.metalstampingdie.com/
